Ad placeholder
Lassandra: Difference between revisions
mNo edit summary |
|||
| (3 intermediate revisions by 3 users not shown) | |||
| Line 5: | Line 5: | ||
{{Infobox creature | {{Infobox creature | ||
| name = Harper Lassandra | | name = Harper Lassandra | ||
| image = <gallery> | | image = <gallery> | ||
Harper Lassandra.jpg|In-game | Harper Lassandra.jpg|In-game | ||
| Line 13: | Line 11: | ||
| identity = Female | | identity = Female | ||
| va = Clare Corbett | | va = Clare Corbett | ||
| faction = [[Harpers]] | | faction = [[Harpers]] | ||
| size = [[Medium]] | | size = [[Medium]] | ||
| type = [[Humanoid]] | | type = [[Humanoid]] | ||
| | | race = [[Human]] | ||
| class = [[Fighter]] | |||
| level = 5 | |||
| e hp = 32 | | e hp = 32 | ||
| hp = 46 | | hp = 46 | ||
| t hp = 59 | | t hp = 59 | ||
| ac = 14 | |||
| movement m = 9 | | movement m = 9 | ||
| weight kg = 75 | |||
| xp = 75 | | xp = 75 | ||
| str = 16 | | str = 16 | ||
| dex = 11 | | dex = 11 | ||
| Line 32: | Line 32: | ||
| str save prof = yes | | str save prof = yes | ||
| con save prof = yes | | con save prof = yes | ||
| athletics = 3 | | athletics = 3 | ||
| acrobatics = 0 | | acrobatics = 0 | ||
| perception = 1 | | perception = 1 | ||
| passives = Extra Attack, Opportunity Attack | |||
| uuid = c6dfb2aa-809f-4b3e-8b32-968c10184ec3 | |||
| uid = S_SCL_HarperScout_000 | |||
| stats = SCL_Caravan_Ambusher_Lassandra | |||
}} | }} | ||
'''Harper Lassandra''' | '''Harper Lassandra''' leads a small group of [[Harpers]] on patrol to the hill east of [[Last Light Inn]] during [[Act Two]]. | ||
{{DiQ|'Last Light', indeed. Savour it while you can.|Lassandra|, after arriving at Last Light Inn.}} | {{DiQ|'Last Light', indeed. Savour it while you can.|Lassandra|, after arriving at Last Light Inn.}} | ||
== Involvement == | == Involvement == | ||
=== | === Act Two === | ||
==== Last Light Inn ==== | |||
If the party enter the [[Shadow-Cursed Lands]] via the [[Grymforge]] lift, Lassandra can be encountered as part of a Harper expedition consisting of herself, {{CharLink|Karrow}}, {{CharLink|Meygan}}, and {{CharLink|Yonas}}. Lassandra orders Yonas to move in, but is quickly ambushed and corrupted by a [[Shadow]]. If intervening and saving her, Lassandra thanks the party and marks a safe location on their map, known as [[Last Light Inn]]. | |||
She then remains idle near the entrance to | At Last Light Inn, {{CharLink|Elifer}} is distrustful of the party despite Lassandra's attempts to vouch for them. She then remains idle near the entrance to the inn, watching over the bridge from the barricades. | ||
After speaking with {{CharLink|Jaheira}} inside the | After speaking with {{CharLink|Jaheira}} inside the inn, Lassandra moves to the bridge in front of the Last Light Inn with {{CharLink|Branthos}}, {{CharLink|Elindale}}, {{CharLink|Manus}}, and {{CharLink|Skywin}}. They wait for the party so they can intercept and {{Quest|Follow the Convoy|ambush}} a nearby absolutist convoy and acquire their {{Quest|Seek Protection from the Shadow Curse|source of protection}} against the [[Shadow Curse]]. Accepting the mission causes Lassandra and her squad of Harpers casting {{SAI|Light}} on their weapons and head toward the [[Ruined Battlefield]], where they lay in wait for the [[Absolute|Absolutist]] convoy. The party can go with the group immediately or catch up with them later, as the ambush site is marked on their map. | ||
If | If speaking with {{CharLink|Isobel Thorm|Isobel}} and triggering the fight with {{CharLink|Marcus Falgor|Marcus}}, Lassandra will have already moved to the bridge, out of reach of the battle. If Isobel is not saved, Lassandra turns into a {{Cond|Shadow-Cursed Undead}} and is found at a rocky ledge near the docks. | ||
=== Ambush === | ==== Ambush ==== | ||
Lassandra, along with Harpers Skywin, Elindale, Branthos, and Manus will be waiting in a run-down shack at the Ruined Battlefield. Approaching the ambush site starts the cut-scene, with Lassandra telling the party to hide and to be ready to send the signal, before spawning the encounter. Once {{CharLink|Kar'niss|Kar'niss'}} convoy arrives, the party can attack immediately or hang back. If choosing to stay hidden and keep watching, Kar'niss kills {{CharLink|Vez}}. From there, the party can either signal the Harpers or wait as they start the encounter themselves. After the fight, a {{SmRarityItem|Moonlantern}} can be found on the drider's corpse. | Lassandra, along with Harpers Skywin, Elindale, Branthos, and Manus will be waiting in a run-down shack at the Ruined Battlefield. Approaching the ambush site starts the cut-scene, with Lassandra telling the party to hide and to be ready to send the signal, before spawning the encounter. Once {{CharLink|Kar'niss|Kar'niss'}} convoy arrives, the party can attack immediately or hang back. If choosing to stay hidden and keep watching, Kar'niss kills {{CharLink|Vez}}. From there, the party can either signal the Harpers or wait as they start the encounter themselves. After the fight, a {{SmRarityItem|Moonlantern}} can be found on the drider's corpse. | ||
Alternatively, the party can convince Kar'niss to relinquish the Moonlantern and consign the convoy members to their fate as {{Cond|Shadow-Cursed Undead}}. Either way, Elindale and his squad then depart amiably and return to Last Light Inn. | Alternatively, the party can convince Kar'niss to relinquish the Moonlantern and consign the convoy members to their fate as {{Cond|Shadow-Cursed Undead}}. Either way, Elindale and his squad then depart amiably and return to Last Light Inn. | ||
Reaching the Shadow-Cursed Lands through the [[Rosymorn Monastery Trail]] starts {{Quest|Follow the Convoy}} instead. The party can turn on the convoy and help the Harpers, or protect the convoy to {{Quest|Infiltrate Moonrise Towers|continue their cover}} as a True Soul. Lassandra is absent from this ambush, as she has yet to be rescued from her expedition. | |||
No matter the resolution, if continuing to Last Light Inn, the party can observe Lassandra returning to the sanctuary with Karrow and Meygan. | No matter the resolution, if continuing to Last Light Inn, the party can observe Lassandra returning to the sanctuary with Karrow and Meygan. | ||
=== After Ambush === | ==== After Ambush ==== | ||
Once the ambush is over, Lassandra and her first group can later be found mourning Yonas on a rocky ledge near the Last Light Inn docks. | Once the ambush is over, Lassandra and her first group can later be found mourning Yonas on a rocky ledge near the Last Light Inn docks. | ||
=== Assault Moonrise Towers === | ==== Assault Moonrise Towers ==== | ||
Lassandra, along with Meygan, {{CharLink|Mijah}}, and Karrow | Lassandra, along with Meygan, {{CharLink|Mijah}}, and Karrow do not join the assault against [[Absolute]] forces. She remains at the Last Light Inn to patrol its outskirts, before completely disappearing once {{CharLink|Ketheric Thorm}} is defeated. | ||
== Combat == | == Combat == | ||
| Line 87: | Line 86: | ||
* {{MdCharLink|Skywin|Harper Skywin}} | * {{MdCharLink|Skywin|Harper Skywin}} | ||
=== | === Loot === | ||
*{{MdRarityItem|Cloak}} | *{{MdRarityItem|Cloak}} | ||
*{{MdRarityItem|Handaxe +1}} | *{{MdRarityItem|Handaxe +1}} | ||
| Line 93: | Line 92: | ||
*{{MdRarityItem|Scale Mail}} | *{{MdRarityItem|Scale Mail}} | ||
*{{MdRarityItem|Torch}} | *{{MdRarityItem|Torch}} | ||
== Related quests== | |||
* {{Quest|Follow the Convoy}} | |||
* {{Quest|Infiltrate Moonrise Towers}} | |||
* {{Quest|Resolve the Abduction}} | |||
* {{Quest|Seek Protection from the Shadow Curse}} | |||
== Speak with Dead == | == Speak with Dead == | ||
Lassandra can be spoken to with {{SAI|Speak with Dead}}. | |||
{{Dialogue start}} | {{Dialogue start}} | ||
'''Party member: What's your name? | '''Party member:''' What's your name? | ||
* '''Harper Lassandra: Lassandra... | * '''Harper Lassandra:''' Lassandra... | ||
'''Party member:''' Where did you come from? | '''Party member:''' Where did you come from? | ||
| Line 110: | Line 116: | ||
* '''Harper Lassandra:''' Teacher... and Harper agent... | * '''Harper Lassandra:''' Teacher... and Harper agent... | ||
{{Dialogue end}} | {{Dialogue end}} | ||
== Gallery == | == Gallery == | ||
| Line 139: | Line 139: | ||
{{Shadow-Cursed Lands}} | {{Shadow-Cursed Lands}} | ||
[[Category:Humanoids]] | |||
[[Category:Humans]] | [[Category:Humans]] | ||
[[Category:Characters]] | [[Category:Characters]] | ||
[[Category:Characters in Act Two]] | |||
[[Category:Characters in the Shadow-Cursed Lands]] | [[Category:Characters in the Shadow-Cursed Lands]] | ||
[[Category: | [[Category:Fighters]] | ||
[[Category:Members of the Harpers]] | [[Category:Members of the Harpers]] | ||
[[Category:Available to Speak with Dead]] | [[Category:Available to Speak with Dead]] | ||
__INDEX__ | __INDEX__ | ||
Latest revision as of 10:39, 6 March 2025

“'Last Light', indeed. Savour it while you can.„
Involvement[edit | edit source]
Act Two[edit | edit source]
Last Light Inn[edit | edit source]
If the party enter the Shadow-Cursed Lands via the Grymforge lift, Lassandra can be encountered as part of a Harper expedition consisting of herself, Karrow, Meygan, and Yonas. Lassandra orders Yonas to move in, but is quickly ambushed and corrupted by a Shadow. If intervening and saving her, Lassandra thanks the party and marks a safe location on their map, known as Last Light Inn.
At Last Light Inn, Elifer is distrustful of the party despite Lassandra's attempts to vouch for them. She then remains idle near the entrance to the inn, watching over the bridge from the barricades.
After speaking with Jaheira inside the inn, Lassandra moves to the bridge in front of the Last Light Inn with Branthos, Elindale, Manus, and Skywin. They wait for the party so they can intercept and ![]() a nearby absolutist convoy and acquire their
a nearby absolutist convoy and acquire their ![]() against the Shadow Curse. Accepting the mission causes Lassandra and her squad of Harpers casting
against the Shadow Curse. Accepting the mission causes Lassandra and her squad of Harpers casting ![]() on their weapons and head toward the Ruined Battlefield, where they lay in wait for the Absolutist convoy. The party can go with the group immediately or catch up with them later, as the ambush site is marked on their map.
on their weapons and head toward the Ruined Battlefield, where they lay in wait for the Absolutist convoy. The party can go with the group immediately or catch up with them later, as the ambush site is marked on their map.
If speaking with Isobel and triggering the fight with Marcus, Lassandra will have already moved to the bridge, out of reach of the battle. If Isobel is not saved, Lassandra turns into a ![]() and is found at a rocky ledge near the docks.
and is found at a rocky ledge near the docks.
Ambush[edit | edit source]
Lassandra, along with Harpers Skywin, Elindale, Branthos, and Manus will be waiting in a run-down shack at the Ruined Battlefield. Approaching the ambush site starts the cut-scene, with Lassandra telling the party to hide and to be ready to send the signal, before spawning the encounter. Once Kar'niss' convoy arrives, the party can attack immediately or hang back. If choosing to stay hidden and keep watching, Kar'niss kills Vez. From there, the party can either signal the Harpers or wait as they start the encounter themselves. After the fight, a ![]() Moonlantern can be found on the drider's corpse.
Moonlantern can be found on the drider's corpse.
Alternatively, the party can convince Kar'niss to relinquish the Moonlantern and consign the convoy members to their fate as ![]() . Either way, Elindale and his squad then depart amiably and return to Last Light Inn.
. Either way, Elindale and his squad then depart amiably and return to Last Light Inn.
Reaching the Shadow-Cursed Lands through the Rosymorn Monastery Trail starts ![]() instead. The party can turn on the convoy and help the Harpers, or protect the convoy to
instead. The party can turn on the convoy and help the Harpers, or protect the convoy to ![]() as a True Soul. Lassandra is absent from this ambush, as she has yet to be rescued from her expedition.
as a True Soul. Lassandra is absent from this ambush, as she has yet to be rescued from her expedition.
No matter the resolution, if continuing to Last Light Inn, the party can observe Lassandra returning to the sanctuary with Karrow and Meygan.
After Ambush[edit | edit source]
Once the ambush is over, Lassandra and her first group can later be found mourning Yonas on a rocky ledge near the Last Light Inn docks.
Assault Moonrise Towers[edit | edit source]
Lassandra, along with Meygan, Mijah, and Karrow do not join the assault against Absolute forces. She remains at the Last Light Inn to patrol its outskirts, before completely disappearing once Ketheric Thorm is defeated.
Combat[edit | edit source]
Attacks and Abilities[edit | edit source]


Allies[edit | edit source]
Shadow Ambush[edit | edit source]
Ambush the Convoy[edit | edit source]
Loot[edit | edit source]
Related quests[edit | edit source]
Speak with Dead[edit | edit source]
Lassandra can be spoken to with ![]() .
.
Party member: What's your name?
- Harper Lassandra: Lassandra...
Party member: Where did you come from?
- Harper Lassandra: Last Light...
- Party member: Last Light? What's that?
- Harper Lassandra: Old inn... refuge...
- Party member: Last Light? What's that?
Party member: Why were you here?
- Harper Lassandra: Orders... scouting the shadows...
Party member: What is your profession?
- Harper Lassandra: Teacher... and Harper agent...
Gallery[edit | edit source]
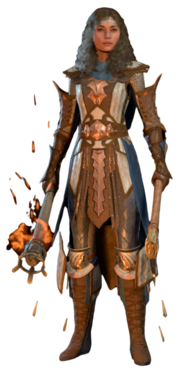
Lassandra's model.
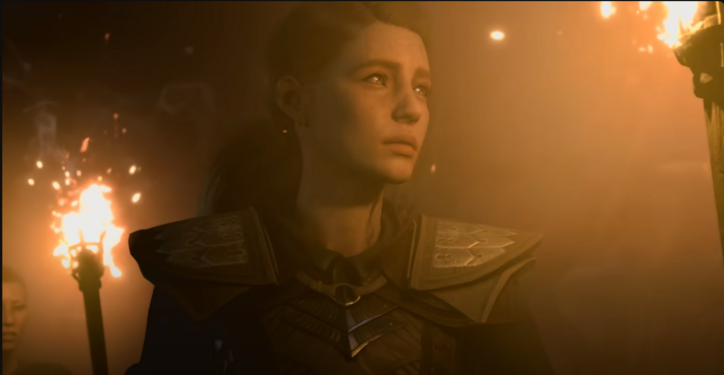
Harper Lassandra before the game's official release.


Notes[edit | edit source]
- Lassandra wears a set of armor identical to the
 Scale Mail +2 or Yuan-Ti Scale Mail armor set, but with a combination of colors inaccessible to a player character. She has a
  Harp-Shaped Pin pinned on her chest.
- If Branthos is killed during the convoy's ambush, Lassandra - if present - can take the lead in talking to the player character instead and conclude the quest.
- Lassandra, much like Karrow, Meygan, and Yonas, are the only level 5 Harpers in Act Two.
- All the other Harpers in the Last Light Inn are level 6, except for Jaheira, who is level 8.
- Harper Leysin is an almost-exact physical copy of Lassandra, with the same appearance and outfit, save for having blond hair and different a different stat block.
- As of Patch 7, despite having Extra Attack, Lassandra is not able to attack twice during her turns.
External links[edit | edit source]
 Lassandra on the Forgotten Realms Wiki