Ad placeholder
The Wyrmway
| Wyrm's Rock Fortress | ||||
| The Dragon's Sanctum | ||||
| ↑ | ||||
| The Wyrmway | ||||
Entering Wyrmway[edit | edit source]
The entrance is hidden in a passage in the Wyrm's Rock Prison's western block, where two dragon head torches can be found. The party can gain access to the secret passage by first hitting both dragon head torches with any source of![]() Lightning damage such as or and then use them. Alternatively, the Mousehole to Wyrm Rock's Cells, located on the western shore of Wyrm's Rock Fortress, can be used. The secret passage can also be opened by sending a through the mousehole and placing it behind the wall between the two dragon torches on the Wyrmway side. Then simply using the dragon torches with a character on the Wyrm Rock Prison side opens the wall passage. It works if the dragon head torches shine blue. Moving the mage hand away closes the passage.
Lightning damage such as or and then use them. Alternatively, the Mousehole to Wyrm Rock's Cells, located on the western shore of Wyrm's Rock Fortress, can be used. The secret passage can also be opened by sending a through the mousehole and placing it behind the wall between the two dragon torches on the Wyrmway side. Then simply using the dragon torches with a character on the Wyrm Rock Prison side opens the wall passage. It works if the dragon head torches shine blue. Moving the mage hand away closes the passage.
Chambers of Wyrmway[edit | edit source]
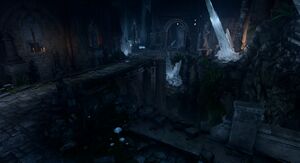
Part of the trial is proving that the party members are worthy to speak with Ansur. To prove this, the party must pass four trials of Courage, Insight, Strategy and Justice. Failing any of the trials results in the party facing hostilities [1].
Failing a Trial[edit | edit source]
If failing any trial, the party members are attacked by five groups of undead, one wave in each chamber and another in the central area. Once all the undead have been dispatched, the party can proceed in spite of its failure, and without needing to complete any remaining trials. Failing a challenge is the only way to obtain ![]() Journal of Past Adventurers N°5 and find out what happened to the party's predecessors. The hostiles to be fought consist of:
Journal of Past Adventurers N°5 and find out what happened to the party's predecessors. The hostiles to be fought consist of:
Chamber of Justice[edit | edit source]
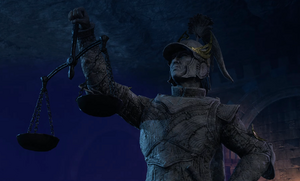
This trial takes place in the far left area, with no door.In this trial it is necessary to remove a dishonorable judge and correctly match the punishment to its respective crime. The crime is shown in paintings starting from "The Apple" and ending with "The Judgement". These paintings depict a man who steals an apple to feed urchin children, goes beyond to steal an artifact, is then chased around Baldur's Gate and is finally judged with a punishment.
The Judge is in the middle of the shrouded area, is dishonorable, and must be removed with magic as it is invulnerable to all damage sources and cannot be pushed (physically or magically).
Known ways to remove the judge:
- Methods that Control Undead
- (teleport the judge anywhere outside the circle)
- and (push the judge out with the damage field avoidance behaviour)
If the judge is removed, the shadows are lifted, each of the three shadowed paintings can be picked up or inspected. The three paintings are named The Cell, Freedom, and The Hanging; the paintings represent the final judgement for the crime. One of them must be placed upon the Empty Niche found at the center of the room.
To solve the trial, the sentence needs to be proportional to the crime. When interacting with the statue, if Wyll is in the party, he offers hints regarding correct answers to the trial; "The right path (to justice) often lies between the extremes." Placing The Cell painting on the Empty Niche solves the trial. Inserting Freedom or The Hanging into the niche fails the trial and summons a horde of skeletons.
Alternatively the painting can be inserted without dispelling the judge by dragging the far eastern painting into the empty niche.[Needs Verification]
Chamber of Insight[edit | edit source]
Starting this trial requires the party to walk over a nearly invisible path between the two left-hand statues of Balduran.
In this trial it is necessary to discern which counselor does not properly advise for the city's prosperity and strike them down. The three possible choices are Stedd, Amaps, and Suelto.
To know whose solution is not correct the party must read the books that are flying around. Plucking them (there is a dialogue cursor) requires a check. It is also possible to throw the books to stop them from flying and be able to read them, or apply Frightened. Using makes the book instantly drop to the ground to be picked up or read. Activating Turn-Based Mode when near a book makes picking it up or throwing it easier. If a party member shouts for the book to stop moving, a different party member must be used to trigger the check. Attacking the books is not recommended, because they are destroyed then.
After reading the books, it is revealed that Suelto adopted a cruel ideology, ill-fitting the council, and must be eliminated. If Wyll is in the party, it is possible to speak with him after reading the final book; he advises Suelto is the one to attack.
Attacking Suelto at the end of the chamber results in the party correctly passing this test. The target must be attacked only once , and without any on-death effects (such as the illithid power ), or the trial is failed, even if attacking the correct target. If dual-wielding, automatic off-hand attacks must be deactivated. Suelto may also be attacked with a ranged weapon from the entrance platform without dealing with the books or the winding pathway.
Failing the trial summons a number of undead and a Death Shepherd to buff them.
Chamber of Strategy[edit | edit source]
This trial takes place in the lower right-hand room.
In this trial it is necessary to finish a game of Lanceboard (a.k.a. Chess in Faerûn) by letting the Dark King fall in two moves only. If Gale is in the party, he mentions he played Lanceboard and would like to offer his help. If accepted, he advises what is required to finish the trial. Speaking with the Statue of Balduran activates this dialogue.
Solutions[edit | edit source]
IMPORTANT: Solutions for this trial are randomized, these solutions must be taken with caution.
- (Suggested by Gale) - First threatening the Black King by moving the Rook one square to the right. Then the following two options occur: Option #1 - Black Bishop eliminates the White Rook, leaving the White Queen to move 3 squares to the right causing a checkmate. Option #2 - Black King moves top right square, then moving the White Knight one square up and two squares left causes a checkmate.
- (Suggested by Gale) - Moving the White Queen diagonally to the upper right corner of the board to place the Black King in check and limiting its movement option to the black square on its forward left diagonal. After the Black King makes this move, moving the White Queen four squares to the left, directly in front of the White Rook and diagonal to the Black King, causes a checkmate.
- (Alternative "Brawn" Solution) - The Black King is vulnerable to lightning damage. Killing it this way also results in passing the challenge.
There are three attempts to finish this trial correctly, the remainder indicated by the number of red heart icons left at the top of the board; each failed attempt results in one heart shattering. Additionally, whenever interacting with one of the Lanceboard pieces, there is a pointed notification to show where the pieces can move, according to the standard rules of chess. If Gale is in the party and his help is accepted, the appropriate pieces and squares are marked with a white light upon interacting with a piece.
Chamber of Courage[edit | edit source]
This trial takes place in the right most room. Entering the room and speaking with the Balduran statue makes the talking party member the torch carrier for the trial. In this trial, that party member will be holding a torch in their hand and must withstand the elements to pass the test.
This is a fighting trial that lasts 4 turns. The party member holding the torch must survive, and the rest of the party must be prepared to defend the torch carrier. Be aware the torch is bound to the torch carrier, preventing other weapons from being equipped and preventing the torch from being passed to others. As such, it is recommended to be held by spellcasters, or any class not dependent on their mainhand melee weapon. The torch is one-handed; offhand weapons and shields are unaffected.
Elementals will spawn on the following turns:
- Turn 1: 2x Air Elemental and 2x Water Elemental
- Turn 2: 1x Air Myrmidon and 1x Water Myrmidon
- Turn 3: 1x Air Myrmidon and 1x Water Myrmidon
- Turn 4: None
The torch carrier is marked with a Sacred Flame condition, which prevents them from turning invisible and makes them more likely to be targeted by the elementals in this trial. Applying on the torch carrier trivializes the entire encounter, as this prevents enemies from targeting the torch carrier. The elementals may then be killed by others directly, or shoved over the edge of the arena they spawn near to kill them instantly (air elementals are immune to but can be knocked back by other means such as ).
The Attuned Crystals can be shattered during the battle to give any nearby character resistance to elemental damage.
The four lightning orbs around the circumference of the encounter area light up as the turns of the combat proceed. These lightning orbs do not attack and have no impact on combat; they are merely indicators of how many turns have elapsed.
The Dragon’s Sanctum[edit | edit source]
After successfully completing all four trials the door in the main hall is unlocked, granting access to The Dragon's Sanctum, where Ansur is said to lie in wait.
Related locations[edit | edit source]
Related quests[edit | edit source]
Related literature[edit | edit source]
 Journal of Past Adventurers N°1
 Journal of Past Adventurers N°2
 Journal of Past Adventurers N°3
 Journal of Past Adventurers N°4
 Journal of Past Adventurers N°5
Notable loot[edit | edit source]
Notable items obtained in this location, whether looted, purchased, or obtained as a quest reward:
 Balduran's Giantslayer - Dropped by Ansur
 Dear Ansur - Dropped by Ansur
 Helm of Balduran - On a pedestal behind Ansur
Notable NPCs[edit | edit source]
Creatures[edit | edit source]
- Air Elemental (x2)
- Air Myrmidon (x2)
- Water Elemental (x2)
- Water Myrmidon (x4)
- Fallen Champion (x4)
- Fallen Wizard (x7)
- Fallen Ranger (x15)
- Fallen Fighter (x16)
Notes[edit | edit source]
- ↑ The party will always be awarded XP and allowed to proceed to The Dragon's Sanctum at the end of the trials whether they successfully complete all the trials or fail and fight the hostiles.

