Modding:Creating meta.lsx
| This page is a modding page, and follows its own rules and standards separate from the rest of the wiki. |
| bg3.wiki modding |
|---|
| Modding homepage |
| Modding resources - Meshes, Models, Tools, etc. |
| Modding guides |
| Hair modding |
| Head modding |
| Item modding - Armours, Outfits, Weapons etc. |
| Race/class modding |
A meta.lsx file is a necessity if you plan on making .pak mods. Here's how to set one up.
Tools You'll Need[edit | edit source]
- BG3 Modders Multitool
- BG3 Mini Tool
- VSCode or Notepad++
- UUID Generator Extension in VSCode OR ToolBucket & XML Tools in Notepad++ found via Plugins > Plugins Admin then search for it and install.
To generate a UUID in VSCode, you can highlight a section or click in a blank area, right click, and select Generate UUID here.
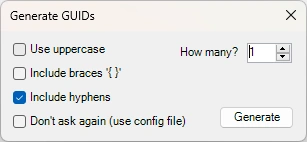
For the UUID generation in Notepad++, once ToolBucket is installed, you want to press Alt + Shift + G. It will bring up a window as shown below. Keep Include hyphens ticked, and you can also click Don't ask again if you won't use any of the other options. Then click Generate.
Or use an online UUID-Generator.
Meta.lsx[edit | edit source]
Most pak mods need a meta.lsx. A meta.lsx is a file that tells the mod loader certain "meta" information about your mod. This is information such as author's name, version number, etc.
The file path should be: ModName/Mods/YourShared/meta.lsx
The ModName folder is your workspace folder for your mod. Each mod needs one, and it holds all of the other folders. Then you would create a folder called Mods, then a new folder with a custom name (could be same as the mod name) this is what will be known as YourShared folder, and then finally you want to create a .txt file and rename it to meta.lsx.
The only time your mod won't need a meta.lsx if it is classed as a basegame override. You will know them by the mods that get put into the Overrides section of BG3 Mod Manager or have that orange highlight to them. In some cases, you may still add a meta just so people can place the mod into their load order if they prefer.
Creating your meta.lsx manually[edit | edit source]
Here is the template for meta.lsx. Just paste this into the meta.lsx file you created earlier, and then follow the instructions to edit the template.
<?xml version="1.0" encoding="UTF-8"?>
<save>
   <version major="4" minor="0" revision="9" build="331"/>
   <region id="Config">
       <node id="root">
           <children>
               <node id="Dependencies"/>
               <node id="ModuleInfo">
                   <attribute id="Author" type="LSString" value="AUTHOR NAME HERE"/>
                   <attribute id="CharacterCreationLevelName" type="FixedString" value=""/>
                   <attribute id="Description" type="LSString" value="DESCRIPTION HERE"/>
                   <attribute id="Folder" type="LSString" value="MOD FOLDER NAME HERE"/>
                   <attribute id="LobbyLevelName" type="FixedString" value=""/>
                   <attribute id="MD5" type="LSString" value=""/>
                   <attribute id="MainMenuBackgroundVideo" type="FixedString" value=""/>
                   <attribute id="MenuLevelName" type="FixedString" value=""/>
                   <attribute id="Name" type="LSString" value="MOD NAME HERE"/>
                   <attribute id="NumPlayers" type="uint8" value="4"/>
                   <attribute id="PhotoBooth" type="FixedString" value=""/>
                   <attribute id="StartupLevelName" type="FixedString" value=""/>
                   <attribute id="Tags" type="LSString" value=""/>
                   <attribute id="Type" type="FixedString" value="Add-on"/>
                   <attribute id="UUID" type="FixedString" value="UUID HERE"/>
                   <attribute id="Version64" type="int64" value="36028797018963968"/>
                   <children>
                       <node id="PublishVersion">
                           <attribute id="Version64" type="int64" value="36028797018963968"/>
                       </node>
                       <node id="TargetModes">
                           <children>
                               <node id="Target">
                                   <attribute id="Object" type="FixedString" value="Story"/>
                               </node>
                           </children>
                       </node>
                   </children>
               </node>
           </children>
       </node>
   </region>
</save>
Let's go over the lines you want to edit:
<node id="Dependencies"/>
Please have a read through of Dependencies for this section and whether it pertains to your mod or not.
<attribute id="Author" type="LSString" value="AUTHOR NAME HERE"/>
In this line you want to put your author name. This is what will be shown in the Author column in Mod Manager. It can be anything, but most people use their nexusmods username.
<attribute id="Description" type="LSString" value="DESCRIPTION HERE"/>
This is a short description that will display when the user hovers over your mod in BG3 Mod Manager.
<attribute id="Folder" type="LSString" value="MOD FOLDER NAME HERE"/>
This needs to match the name of the new folder that we referred to earlier as the YourShared folder. If you don't enter this correctly, stuff in your mod will break.
<attribute id="Name" type="LSString" value="MOD NAME HERE"/>
Name of your mod goes here. Do not put - before a b, as we have found out lately that can cause the mod not to load.
<attribute id="UUID" type="FixedString" value="UUID HERE"/>
Generate a unique UUID for this line. This is how Mod Manager tells mods apart, so this UUID must be unique, unless you want it to override another mod.
<attribute id="Version64" type="int64" value="36028797018963968"/>
Version numbers in the meta.lsx are in a Int64 format. When read by BG3 Mod Manager, this line reads as 1.0.0.0. You can use BG3 Mod Manager, the multitool or Padme's mini tool to generate this Int64 version number. This is also the line you change for each new update.
                       <node id="PublishVersion">
                           <attribute id="Version64" type="int64" value="36028797018963968"/>
                       </node>
This version number is the version it was when published. Can remain this number even when updating. However, you can make it the same number as the update number. The reason this exists is for Larian more than it is for us. This is because if they ever make a new pak during development their ``PublishVersion`` will be whatever their current game version is when that pak is created.
If your mod is dependent on another mods assets (remember get permission) it is best to add that mod as a dependency learn how here.
Generating a Version Number with the tools[edit | edit source]
You can generate a version number with Multitool, BG3 Mod Manager or Padme's mini tool. Here is how:
Multitool[edit | edit source]
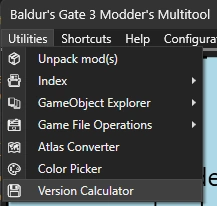
When open go to Utilities > Version Calculator as shown below:
Once open you will get this:
Use the up and down arrows on the Major/Minor/Revision/Build, and it will change the number below. Once set to the version you want, use the copy button on the second line and paste it into the first of this line in your meta:
<attribute id="Version64" type="int64" value="36028797018963968"/>
BG3 Mod Manager[edit | edit source]
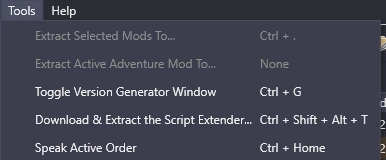
In BG3 Mod Manager go to Tools > Toggle Version Generator Window, or alternatively while open press Ctrl + G to open it. As below:
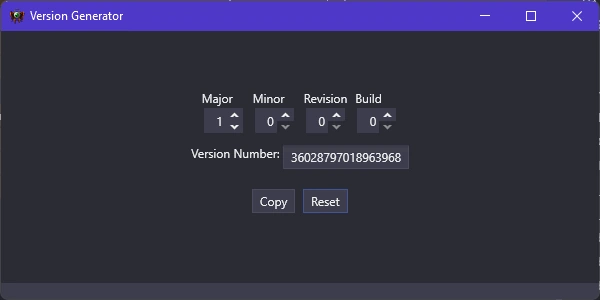
Once open you will see this:
Use the up and down arrows on the Major/Minor/Revision/Build, and it will change the number below. Once set to the version you want, use the copy button and paste it into the first of this line in your meta:
<attribute id="Version64" type="int64" value="36028797018963968"/>
BG3 Mini Tool[edit | edit source]
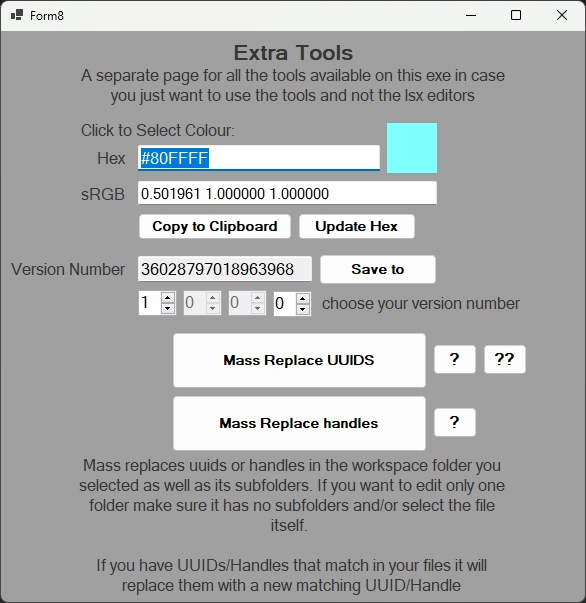
Go to the Extra Tools Button
It will open the current extra tools of the mini tool.
Use the up and down arrows on the first and last number and it will change the number below. Once set to the version, you want to either highlight the text in the box and copy and paste it into the first of this line in your meta:
<attribute id="Version64" type="int64" value="36028797018963968"/>
Or use the Save to button, then locate your meta.lsx and it will override the lines for you.
Creating your meta.lsx with the Multitool[edit | edit source]
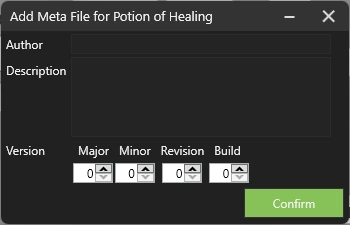
Once your mod is complete and ready to be tested in-game, create a Mods folder inside your workspace folder, then drag your workspace folder to the blue box that says "Drop mod workspace folder or a mod.pak here". If your Mods folder doesn't have a meta.lsx, it will bring up this popup:
In the Author box, put the name you go by on nexusmods, or whatever you want.
In Description, describe your mod a little, can be anything.
Then choose your version number for your mod. Once ready, you can click the confirm button.
If wanting to update the number, you can delete your meta.lsx and drag your workspace folder again over to the blue box, which will trigger this popup again.
Creating your meta.lsx with bg3 mini tool by Padme4000[edit | edit source]
If you find it easier to follow videos or have a video alongside a written tutorial, please find my video here on how to use that section of my tool.
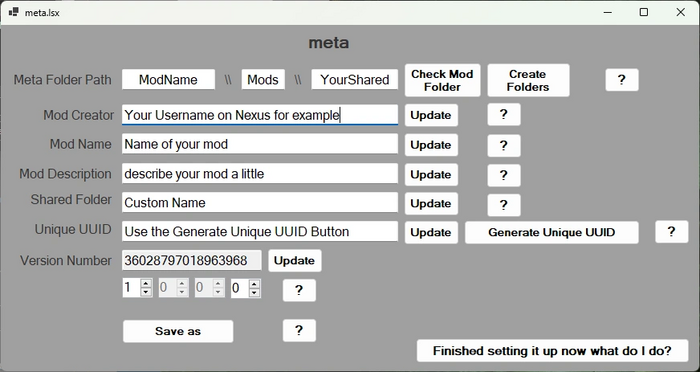
Once you open the tool you will see a button called meta that is the one we want.
If you don't already have the folders setup you can use the top part of this window to create the folders. They will be created in a folder called Mods where the tool exe is. Or it will create that folder if it doesn't already exist.
Mod creator
- type in the name you want associated with the mod such as your nexusmods name. Click update when you've finished typing it in.
Always click update.
Mod name
- line give your mod a name that will show up in the mod managers.
Mod description
- can be anything, just describe it a little or add nothing.
Shared Folder - you want this line to be the same name you give your secondary folders.
- We will use the meta path as an example:
- ModName/Mods/YourShared this last folder needs to match the name you give that line
Unique UUID
- use the generated unique uuid button and then click update once it's generated.
- you want this to be unique so it doesn't clash with other mods
Version Number
- by default it is set to 1.0.0.0 so just in case the file has changed at all click the update button so it sets it back to 1.0.0.0
Now you can click save as and go save your file in the ModName/Mods/YourShared folder.
Congrats! Your meta.lsx is ready to go.
