Modding:Face and body textures: Difference between revisions
No edit summary |
(typo) |
||
| (23 intermediate revisions by 6 users not shown) | |||
| Line 3: | Line 3: | ||
|description=This page is a hub for everything related to Modding Baldur's Gate 3. Check out the following guides to learn how to mod BG3. | |description=This page is a hub for everything related to Modding Baldur's Gate 3. Check out the following guides to learn how to mod BG3. | ||
|image=Modding_resources.webp | |image=Modding_resources.webp | ||
}}{{ | }}{{Modding box}} | ||
== Humanoid == | |||
{{Modding sidebar}} | |||
== Editing the CLEA/HMVY == | == Editing the CLEA/HMVY == | ||
To edit CLEA/HMVY textures, it is best to break them down to their RGBA channels and edit each channel individually. | |||
<br> | <br>For example in GIMP to separate them into their channels you would do this: | ||
# Open the texture in GIMP | |||
# Go to Colors > Components > Decompose > Switch Color Model to RGBA | |||
# Once the Color Model is selected press OK. | |||
# This will open another window/page with each channel as layers. You can now edit each channel separately using the guide below to know what each channel does. | |||
# When you are finished making your edits go to; Colors > Components > Compose > Switch Color Model to RGBA. | |||
# Once the Color Model is selected, press OK. | |||
# It will now open another window/page with the texture repacked with its channels together. You can now export your texture. When exporting your texture make sure the extension is .DDS not .dds, and the compression is either BC3/DXT5 or BC1/DXT1, as below. | |||
== CLEA == | == CLEA == | ||
DDS Format: BC3/DXT5 Linear | DDS Format: BC3/DXT5 Linear | ||
* Red Channel - Cavities | * Red Channel - Cavities/Pores | ||
* Green Channel - Eyebrows | * Green Channel - Eyebrows | ||
* Blue Channel - Lips | * Blue Channel - Lips | ||
| Line 61: | Line 57: | ||
Head_NM.webp|NM | Head_NM.webp|NM | ||
</gallery> | </gallery> | ||
== Tattoo and Makeup Atlases == | |||
DDS Format: BC1/DXT1 Linear | |||
=== Tattoos === | |||
* Red, Green, and Blue are all different tattoo designs. Can design on any. | |||
=== Makeup === | |||
* Red Channel - Makeup options | |||
* Green Channel - Gith spots | |||
* Blue/Alpha - Not used | |||
== Dragonborn == | |||
== CTLO == | |||
'''CTLO - Cavity.Thickness.Lips.Occlusion''' | |||
DDS Format: BC3/DXT5 Linear | |||
* Red Channel - Cavity | |||
* Green Channel - Thickness | |||
* Blue Channel - Lips | |||
* Alpha Channel - Ambient Occlusion | |||
Thickness - it's inverted compared to one from Marmoset and much lighter | |||
AO - it's much whiter then one you will bake in Marmoset or Substance, so adjust them if you want to mix with yours | |||
== HMVY == | |||
'''HMVY - Hemoglobin.Melanin.Vein.Yellowing''' | |||
DDS Format: BC3/DXT5 Linear | |||
* Red Channel - Hemoglobin | |||
* Green Channel - Melanin (pigment amount) | |||
* Blue Channel - Veins | |||
* Alpha Channel - Yellowing | |||
[[File:DGB HMVY1.png|frameless|445x445px]] | |||
== NORMAL == | |||
DDS Format: BC3/DXT5 Linear | |||
To convert a "regular" normal map to BG3, put the Red channel into Alpha channel and set Red channel to black | |||
== MSK == | |||
DDS Format: BC1/DXT1 Linear | |||
* Red Channel - Non-skin (horns, scales, any keratin parts) | |||
* Green Channel - Convexity map | |||
* Blue Channel - Emty black | |||
This is just to show how exactly MSK channels works: | |||
[[File:DGB_MSK_1.png|alt=DGB MSK Channels|frameless]][[File:DGB_MSK_2.png|frameless]] | |||
+ Small test to make more obvious how works R channel | |||
== DMSK == | |||
sRGB - every channel is decorative mask (trough them you make guilded mask, add details) | |||
In the 2nd picture you could see DMSK blue channel as yellow guilding: | |||
[[File:DGB DMSK RGB1.png|frameless|358x358px]][[File:DGB DMSK B examle.png|frameless|358x358px]] | |||
This document could also give you better understanding [https://docs.google.com/document/d/1nE4QjTKedF0KkKwOsVVAI87GgXxdQiJSsLYOnWO5YdA/edit#heading=h.zb542upz0efo '''Dragonborn Skin Colour References'''] by Padme4000 | |||
== Draconic Bloodline DMSK == | |||
sRGB - every channel is draconic bloodline decorative mask - they will replace DMSK if gamer choose the DB subclass, keep it in mind | |||
[[File:DGB Draconic Bloodline DMSK1.png|frameless|358x358px]] | |||
You could check every separate channel in files here [https://www.nexusmods.com/baldursgate3/mods/11111 Dragonborn head Substance Painter Assets] all existing DGB head textures unpacked by channels in separate folders | |||
Also you could see every DGB head material including NPC's with this mod [https://www.nexusmods.com/baldursgate3/mods/11011 Dragonborn head material checker - Modder's Tool].{{Modding navbox}} | |||
[[Category:Modding resources]] | [[Category:Modding resources]] | ||
[[Category:Head modding]] | |||
Latest revision as of 20:23, 24 July 2024
| This page is a modding page, and follows its own rules and standards separate from the rest of the wiki. |
Humanoid[edit | edit source]
| bg3.wiki modding |
|---|
| Modding homepage |
| Modding resources - Meshes, Models, Tools, etc. |
| Modding guides |
| Hair modding |
| Head modding |
| Item modding - Armours, Outfits, Weapons etc. |
| Race/class modding |
Editing the CLEA/HMVY[edit | edit source]
To edit CLEA/HMVY textures, it is best to break them down to their RGBA channels and edit each channel individually.
For example in GIMP to separate them into their channels you would do this:
- Open the texture in GIMP
- Go to Colors > Components > Decompose > Switch Color Model to RGBA
- Once the Color Model is selected press OK.
- This will open another window/page with each channel as layers. You can now edit each channel separately using the guide below to know what each channel does.
- When you are finished making your edits go to; Colors > Components > Compose > Switch Color Model to RGBA.
- Once the Color Model is selected, press OK.
- It will now open another window/page with the texture repacked with its channels together. You can now export your texture. When exporting your texture make sure the extension is .DDS not .dds, and the compression is either BC3/DXT5 or BC1/DXT1, as below.
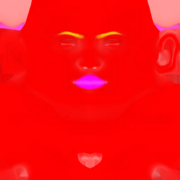
CLEA[edit | edit source]
DDS Format: BC3/DXT5 Linear
- Red Channel - Cavities/Pores
- Green Channel - Eyebrows
- Blue Channel - Lips
- Alpha Channel - Ambient Occlusion
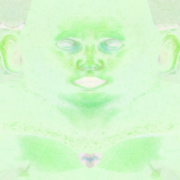
HMVY[edit | edit source]
DDS Format: BC3/DXT5 Linear
Skin tinting
- Red Channel - Hemoglobin
- Green Channel - Melanin (freckles)
- Blue Channel - Veins
- Alpha Channel - Yellowing
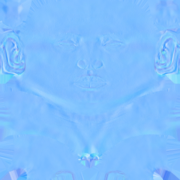
NORMAL[edit | edit source]
DDS Format: BC3/DXT5 Linear
Wrinkles, scars, any indents in the skin
To convert a "regular" normal map to BG3, put the Red channel into Alpha channel and set Red channel to black
MSK[edit | edit source]
DDS Format: BC1/DXT1 Linear
- Red Channel - Non-skin (horns, nail colour)
- Green Channel - Pigmentation (lighter = less, also vitiligo)
- Blue Channel - Tear/Lip Lines
Gallery[edit | edit source]
CLEA
HMVY
NM


Tattoo and Makeup Atlases[edit | edit source]
DDS Format: BC1/DXT1 Linear
Tattoos[edit | edit source]
- Red, Green, and Blue are all different tattoo designs. Can design on any.
Makeup[edit | edit source]
- Red Channel - Makeup options
- Green Channel - Gith spots
- Blue/Alpha - Not used
Dragonborn[edit | edit source]
CTLO[edit | edit source]
CTLO - Cavity.Thickness.Lips.Occlusion
DDS Format: BC3/DXT5 Linear
- Red Channel - Cavity
- Green Channel - Thickness
- Blue Channel - Lips
- Alpha Channel - Ambient Occlusion
Thickness - it's inverted compared to one from Marmoset and much lighter
AO - it's much whiter then one you will bake in Marmoset or Substance, so adjust them if you want to mix with yours
HMVY[edit | edit source]
HMVY - Hemoglobin.Melanin.Vein.Yellowing
DDS Format: BC3/DXT5 Linear
- Red Channel - Hemoglobin
- Green Channel - Melanin (pigment amount)
- Blue Channel - Veins
- Alpha Channel - Yellowing

NORMAL[edit | edit source]
DDS Format: BC3/DXT5 Linear
To convert a "regular" normal map to BG3, put the Red channel into Alpha channel and set Red channel to black
MSK[edit | edit source]
DDS Format: BC1/DXT1 Linear
- Red Channel - Non-skin (horns, scales, any keratin parts)
- Green Channel - Convexity map
- Blue Channel - Emty black
This is just to show how exactly MSK channels works:


+ Small test to make more obvious how works R channel
DMSK[edit | edit source]
sRGB - every channel is decorative mask (trough them you make guilded mask, add details)
In the 2nd picture you could see DMSK blue channel as yellow guilding:


This document could also give you better understanding Dragonborn Skin Colour References by Padme4000
Draconic Bloodline DMSK[edit | edit source]
sRGB - every channel is draconic bloodline decorative mask - they will replace DMSK if gamer choose the DB subclass, keep it in mind

You could check every separate channel in files here Dragonborn head Substance Painter Assets all existing DGB head textures unpacked by channels in separate folders
Also you could see every DGB head material including NPC's with this mod Dragonborn head material checker - Modder's Tool.