Modding:Head Troubleshooting: Difference between revisions
m (→Wrinkles) |
|||
| Line 9: | Line 9: | ||
This page is for a quick reference to issues you might run into when making your head mods. | This page is for a quick reference to issues you might run into when making your head mods. | ||
Anything from Heterochromia not working, to wrinkles | Anything from Heterochromia not working, to wrinkles or your head disappearing when you zoom out. | ||
== Head Disappearing == | |||
If your head is disappearing when you zoom out, you are in luck this is a quick fix. | |||
In blender go to the Object tab (orange square) and scroll down to the BG3 Settings and change the value in LOD Distance to 0. If it already says 0 change it to another value and then back to 0 before exporting. | |||
Alternatively you can use the Plugin by Padme4000 from [https://www.nexusmods.com/baldursgate3/mods/346 here called Create LODs - BG3 Edition] | |||
And select your meshes then click the Button called "Change to LOD 0 - BG3" | |||
[[File:Change LOD to 0 - P4 Plugin.webp|Change LOD to 0 - P4 Plugin.webp]] | |||
== Heterochromia == | == Heterochromia == | ||
Revision as of 17:08, 11 January 2024
| This page is a modding page, and follows its own rules and standards separate from the rest of the wiki. |
| bg3.wiki modding |
|---|
| Modding homepage |
| Modding resources - Meshes, Models, Tools, etc. |
| Modding guides |
| Hair modding |
| Head modding |
| Item modding - Armours, Outfits, Weapons etc. |
| Race/class modding |
Head Troubleshooting
This page is for a quick reference to issues you might run into when making your head mods.
Anything from Heterochromia not working, to wrinkles or your head disappearing when you zoom out.
Head Disappearing
If your head is disappearing when you zoom out, you are in luck this is a quick fix.
In blender go to the Object tab (orange square) and scroll down to the BG3 Settings and change the value in LOD Distance to 0. If it already says 0 change it to another value and then back to 0 before exporting.
Alternatively you can use the Plugin by Padme4000 from here called Create LODs - BG3 Edition
And select your meshes then click the Button called "Change to LOD 0 - BG3"
Heterochromia
Is Heterochromia not working for your custom/edited head? Thankfully this is a quick and easy fix.
So for this you do need to go back into blender.
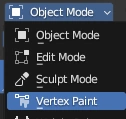
Select your eye mesh in blender and go to Vertex Paint mode.
In the Data Tab (Green triangle that has a tiny square on each point) go to Color Attributes if you don't have anything in there click + then select Face Corner and Byte Color
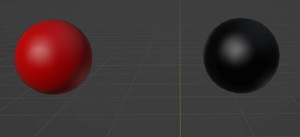
You want to paint the eye on the Left fully red (#FF0000) and keep the right one black.
Now after exporting your mesh again Heterochromia should be working
Wrinkles
So are you noticing that your characters wrinkles/expressions are more extreme than normal?
You want to edit these sections in your Heads Merged MaterialBank: _WrinkleWeightsR, _WrinkleWeightsG, _WrinkleWeightsB and _WrinkleWeightsA
						<node id="VectorParameters">
							<attribute id="BaseValue" type="fvec4" value="0 0 0 0" />
							<attribute id="Enabled" type="bool" value="False" />
							<attribute id="ExportAsPreset" type="bool" value="False" />
							<attribute id="GroupName" type="FixedString" value="" />
							<attribute id="IsColor" type="bool" value="False" />
							<attribute id="ParameterName" type="FixedString" value="_WrinkleWeightsR" />
							<attribute id="Value" type="fvec4" value="0 0 0 0" />
						</node>
						<node id="VectorParameters">
							<attribute id="BaseValue" type="fvec4" value="0 0 0 0" />
							<attribute id="Enabled" type="bool" value="False" />
							<attribute id="ExportAsPreset" type="bool" value="False" />
							<attribute id="GroupName" type="FixedString" value="" />
							<attribute id="IsColor" type="bool" value="False" />
							<attribute id="ParameterName" type="FixedString" value="_WrinkleWeightsG" />
							<attribute id="Value" type="fvec4" value="0 0 0 0" />
						</node>
						<node id="VectorParameters">
							<attribute id="BaseValue" type="fvec4" value="0 0 0 0" />
							<attribute id="Enabled" type="bool" value="False" />
							<attribute id="ExportAsPreset" type="bool" value="False" />
							<attribute id="GroupName" type="FixedString" value="" />
							<attribute id="IsColor" type="bool" value="False" />
							<attribute id="ParameterName" type="FixedString" value="_WrinkleWeightsB" />
							<attribute id="Value" type="fvec4" value="0 0 0 0" />
						</node>
						<node id="VectorParameters">
							<attribute id="BaseValue" type="fvec4" value="0 0 0 0" />
							<attribute id="Enabled" type="bool" value="False" />
							<attribute id="ExportAsPreset" type="bool" value="False" />
							<attribute id="GroupName" type="FixedString" value="" />
							<attribute id="IsColor" type="bool" value="False" />
							<attribute id="ParameterName" type="FixedString" value="_WrinkleWeightsA" />
							<attribute id="Value" type="fvec4" value="0 0 0 0" />
						</node>
For these turn <attribute id="Enabled" type="bool" value="False" /> to <attribute id="Enabled" type="bool" value="True" /> on each of these sections. It will set them all to 0 which I suggest testing first in game as you can still get wrinkles with these values. If you get 0 wrinkles and want some gradually increase the "Value" by 0.1. Best not to touch the "BaseValue" as far as I have tested.
For example:
						<node id="VectorParameters">
							<attribute id="BaseValue" type="fvec4" value="0 0 0 0" />
							<attribute id="Enabled" type="bool" value="False" />
							<attribute id="ExportAsPreset" type="bool" value="False" />
							<attribute id="GroupName" type="FixedString" value="" />
							<attribute id="IsColor" type="bool" value="False" />
							<attribute id="ParameterName" type="FixedString" value="_WrinkleWeightsA" />
							<attribute id="Value" type="fvec4" value="0.1 0.1 0.1 0.1" />
						</node>


