Guide:Hair Mod File Setup: Difference between revisions
m (→Tools) |
|||
| Line 9: | Line 9: | ||
* [https://github.com/ShinyHobo/BG3-Modders-Multitool BG3 Modders Multitool] | * [https://github.com/ShinyHobo/BG3-Modders-Multitool BG3 Modders Multitool] | ||
* [https://www.nexusmods.com/baldursgate3/mods/502 BG3 Mini Tool] | * [https://www.nexusmods.com/baldursgate3/mods/502 BG3 Mini Tool] | ||
* [https://www.nexusmods.com/baldursgate3/mods/437 Hair Template] | |||
* [https://code.visualstudio.com/ vscode] or [https://notepad-plus-plus.org/ Notepad++] | |||
* UUID Generator Extension in vscode (right click when its installed to generate a new uuid) | |||
* ToolBucket & XML Tools in Notepad++ found via Plugins > Plugins Admin then search for it and install. | |||
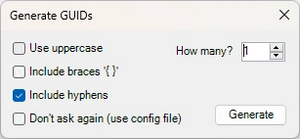
For the UUID generation in Notepad++ once installed ToolBucket you want to press Alt + Shift + G it will bring up a window as shown below. Keep include hyphens ticked and you can also click don't ask again if you won't use any of the other options. | |||
[[File:Toolbucketuuid.webp|thumb]] | |||
If wanting to add more than one hair to your mod you can use my mini tool linked above for adding new slots to CharacterCreationAppearanceVisuals | If wanting to add more than one hair to your mod you can use my mini tool linked above for adding new slots to CharacterCreationAppearanceVisuals | ||
Revision as of 16:14, 24 November 2023
Tools
- BG3 Modders Multitool
- BG3 Mini Tool
- Hair Template
- vscode or Notepad++
- UUID Generator Extension in vscode (right click when its installed to generate a new uuid)
- ToolBucket & XML Tools in Notepad++ found via Plugins > Plugins Admin then search for it and install.
For the UUID generation in Notepad++ once installed ToolBucket you want to press Alt + Shift + G it will bring up a window as shown below. Keep include hyphens ticked and you can also click don't ask again if you won't use any of the other options.
If wanting to add more than one hair to your mod you can use my mini tool linked above for adding new slots to CharacterCreationAppearanceVisuals
If adding an existing hair from the game without wanting to do any edits you can remove the Generated folder from your copy of the template.
Following the Template
So if following my Template or just using it as a guide to copy parts from the game files you can follow along with this tutorial.
You can choose for your hairs to be autosnapping or non autosnapping
What are autosnapping and non autosnapping hairs?
Autosnapping hairs are basically when you have an asset you want to work for more than one race/bodyshape/bodytype but don't want to make a mesh for every single variation. So when setup to be autosnapping you can apply one mesh to be used by multiple races/bodyshapes/bodytypes. And the game "autosnaps" them into place.
Sometimes you may still need three autosnapping meshes, one for the shorter races, one for the default bodytype and one for the strong bodytype. However we will go through when this is needed further into the tutorial.
Non autosnapping is when you have to create your hair mesh for each race/bodyshape/bodytype or rather the ones you want to create it for. For instance for personal use hairs you might decide you only want it for one character. Then non autosnapping might be the way to go.
Localization/English/custom_name_here.loca.xml
Why is it named .loca.xml?
This is because if you package the Main folder also known as your workspace folder with multitool it will auto convert the .loca.xml to .loca
This way you don't have to manually do the conversions yourself. However if you prefer to do manual conversions change the extension to .xml only.
Change custom_name_here to a custom name. Best to add a prefix beforehand. For example I use my username Padme4000 but shorten it to P4
So for my viking braid my .loca.xml is called p4_viking_braid.loca.xml
So the first underscored (yellow) part labeled 1 is a handle. This is technically the same as a UUID except it has no - and instead has 3 extra random digits and adds a h at the beginning. So if you want you can use auto generated UUID's like you can make with notepad ++ or vscode and then remove the - and add a h at the beginning and add 3 more random digits.
For example:
644e4b68-7bdb-4b0a-98ff-9025ce6e20e6 turn this into h644e4b687bdb4b0a98ff9025ce6e20e6a4d
Now the second underscored (pink) part labelled 2 is where we write what we want the game to show when the handle is active. For example when it comes to character creation mods it is what shows up in character creation.
Using Multitool to Generate a Handle
Alternatively you can use multitool to generate a handle for you.
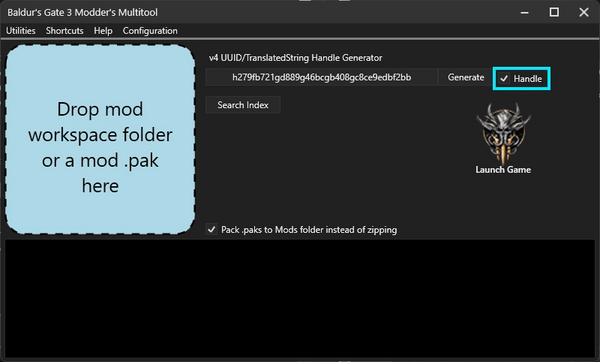
So once you have multitool open make sure to click the box next to Handle so it has a tick inside. Then you can click Generate for the tool to generate a new handle. Clicking on the box that has the handle inside will copy it to your clipboard so you can go to your file and paste it in.
Hair _merged.lsf
What is this? well its the file where we tell the game where to locate our mesh in our mod and other information it might need.
I setup this file first as it makes it easier for me at least to setup the other files we need.
Public\Autosnapping_Template\Content\Assets\Characters\[PAK]_Hair\_merged.lsf.lsx this is where you will find our file in the Template
       <region id="VisualBank">
       <node id="VisualBank">
           <children>
               <node id="Resource">
                   <attribute id="AttachBone" type="FixedString" value="" />
                   <attribute id="AttachmentSkeletonResource" type="FixedString" value="" />
                   <attribute id="BlueprintInstanceResourceID" type="FixedString" value="" />
                   <attribute id="BoundsMax" type="fvec3" value="0.1584038 1.846514 0.167948" />
                   <attribute id="BoundsMin" type="fvec3" value="-0.1540881 1.345605 -0.09591679" />
                   <attribute id="ClothColliderResourceID" type="FixedString" value="" />
                   <attribute id="HairPresetResourceId" type="FixedString" value="" />
                   <attribute id="HairType" type="uint8" value="0" />
                   <attribute id="ID" type="FixedString" value="955faf79-1707-4ea9-87f4-39a5fba49120" />
                   <attribute id="MaterialType" type="uint8" value="0" />
                   <attribute id="Name" type="LSString" value="AT_Hair01" />
                   <attribute id="NeedsSkeletonRemap" type="bool" value="True" />
                   <attribute id="RemapperSlotId" type="FixedString" value="" />
                   <attribute id="ScalpMaterialId" type="FixedString" value="55534266-4ce2-39d1-d2dd-04a8ec90e841" />
                   <attribute id="SkeletonResource" type="FixedString" value="78d8b5f0-726c-232f-a357-3d05c4b3b859" />
                   <attribute id="SkeletonSlot" type="FixedString" value="" />
                   <attribute id="Slot" type="FixedString" value="Hair" />
                   <attribute id="SoftbodyResourceID" type="FixedString" value="" />
                   <attribute id="SourceFile" type="LSString" value="Generated/Public/Autosnapping_Template/[PAK]_Autosnapping_Template/AT_Test.GR2" />
                   <attribute id="SupportsVertexColorMask" type="bool" value="False" />
                   <attribute id="Template" type="FixedString" value="Generated/Public/Autosnapping_Template/[PAK]_Autosnapping_Template/AT_Test.Dummy_Root.0" />
                   <attribute id="_OriginalFileVersion_" type="int64" value="144537400540921856" />
                   <children>
                       <node id="AnimationWaterfall">
                           <attribute id="Object" type="FixedString" value="" />
                       </node>
                       <node id="Base">
                           <children>
                               <node id="Tags">
                                   <attribute id="Object" type="FixedString" value="Hair" />
                               </node>
                           </children>
                       </node>
                       <node id="ClothProxyMapping" />
                       <node id="Objects">
                           <attribute id="LOD" type="uint8" value="0" />
                           <attribute id="MaterialID" type="FixedString" value="89b063ff-7bf3-44a8-7e7d-41b29d0dd469" />
                           <attribute id="ObjectID" type="FixedString" value="AT_Test.AT_Test_Mesh.0" />
                       </node>
Let's go through the lines we want to change. Alternatively you can copy this whole section from the hair you used as a base/edit for your hair. Most hairs can be found in the file below, however if you can't find it there please use index search of multitool
location to vanilla hairs merged when unpacked with Multitool. Multitool\UnpackedData\Shared\Public\Shared\Content\Assets\Characters\[PAK]_Hair
If you copied that whole section from the hair you used you can probably skip a few steps here but I will still go through them.
                   <attribute id="BoundsMax" type="fvec3" value="0.1584038 1.846514 0.167948" />
                   <attribute id="BoundsMin" type="fvec3" value="-0.1540881 1.345605 -0.09591679" />
These lines you want to match the hair you used as a base, especially if you haven't changed the base race it uses.
<attribute id="ID" type="FixedString" value="955faf79-1707-4ea9-87f4-39a5fba49120" />
You want this line to have a unique uuid. Either use multitool to generate a new uuid or an extension/plugin for your program. Such as those mentioned in the tools section of this page.
Character Creation Folder
Full Release Hair Template/Public/Hair_Template/CharacterCreation is the file path for your CharacterCreation Shared/Appearance Visuals lsx files. The path in this example being the one from the template.
For yours it would be your ModName/Public/YourShared/CharacterCreation
So as of full release we can finally use CharacterCreationAppearanceVisuals.lsx again even if we are using autosnapping hairs.
And we can apply the character creation slots for them in CharacterCreationSharedVisuals.lsx or CharacterCreationAppearanceVisuals.lsx
For non autosnapping use only CharacterCreationAppearanceVisuals.lsx.
You can use my mini tool to help create the CharacterCreationAppearanceVisuals.lsx file, as well as its slots. Or alternatively use the file in this template to do it manually.
Remember that you need your hair to be autosnapping to work properly in this section.
<node id="CharacterCreationSharedVisual">
<attribute id="DisplayName" type="TranslatedString" handle="h163f3e2e9f634634a5e41553265771e4" version="1" />
                   <attribute id="SlotName" type="FixedString" value="Hair"/>
                   <attribute id="UUID" type="guid" value="449e617f-8356-46e5-b740-9e4b18200441"/>
                   <attribute id="VisualResource" type="guid" value="fa926de0-feae-4218-806e-3d037b9d83d3"/>
               </node>
So what is the above? well it's the section we need for each hair asset we make. So let's break down each line, some of which we will come back to reference later.


