Modding:Fixing UV errors: Difference between revisions
Jump to navigation
Jump to search
No edit summary |
No edit summary |
||
| (10 intermediate revisions by 4 users not shown) | |||
| Line 1: | Line 1: | ||
{{PageSeo | |||
|title=Modding Resources | |||
|description=This page is a hub for everything related to Modding Baldur's Gate 3. Check out the following guides to learn how to mod BG3. | |||
|image=Modding_resources.webp | |||
}}{{NavModding}} | |||
As of Full Release and the making of [https://github.com/Norbyte/dos2de_collada_exporter this] plugin by Norbyte the below steps are not required when directly exporting as GR2 from blender. However if you wish to export as DAE and come across UV errors the below will work. | |||
This tutorial is from a post shared by [https://www.nexusmods.com/baldursgate3/users/73681713 tyvianpear] in the DbtR Discord server. | |||
== Steps == | == Steps == | ||
# Open two instances of Blender; 2.79b and 3.X (latest) | # Open two instances of Blender; 2.79b and 3.X (latest) | ||
| Line 8: | Line 16: | ||
# Open up another window next to the '''Properties Tab''' by pulling on one of the stripped triangles in the top corner | # Open up another window next to the '''Properties Tab''' by pulling on one of the stripped triangles in the top corner | ||
# In the new window, click on the Properties button under the '''Project Outline''', choose '''UV/Image Editor''' | # In the new window, click on the Properties button under the '''Project Outline''', choose '''UV/Image Editor''' | ||
[[File:Uv_error_1.webp]] | |||
Uv_error_1.webp | |||
# Click on the mesh you want to check first (to be on the safe side go through each mesh one by one) | # Click on the mesh you want to check first (to be on the safe side go through each mesh one by one) | ||
# Hit '''TAB''' to go into '''Edit mode''' | # Hit '''TAB''' to go into '''Edit mode''' | ||
# Click on the vertical '''Helpers tab''' and make sure that the '''Select All Problems''' box is checked | # Click on the vertical '''Helpers tab''' and make sure that the '''Select All Problems''' box is checked | ||
# Click on '''Check UV Triangles''' | # Click on '''Check UV Triangles''' | ||
[[File:Uv_error_2.webp]] | |||
Uv_error_2.webp | |||
# At the very top of Blender, you'll see a notification telling you how many UV problems were found. They will also highlight them in orange on your mesh and in the graph on the right | # At the very top of Blender, you'll see a notification telling you how many UV problems were found. They will also highlight them in orange on your mesh and in the graph on the right | ||
[[File:Uv_error_3.webp]] | |||
Uv_error_3.webp | |||
# To the left of your model, you'll see '''Remove Doubles''' in the '''Tools tab''' | # To the left of your model, you'll see '''Remove Doubles''' in the '''Tools tab''' | ||
# Click on it and you'll see a message at the top, ''Removed 0 vertices'' because the merge distance is too short to combine any of the overlapping vertices | # Click on it and you'll see a message at the top, ''Removed 0 vertices'' because the merge distance is too short to combine any of the overlapping vertices | ||
| Line 27: | Line 29: | ||
# Keep an eye on your mesh and make sure it's not getting too distorted | # Keep an eye on your mesh and make sure it's not getting too distorted | ||
# After each vertex removal/merge, select and deselect (CTRL-A in edit mode) the mesh and repeat the earlier steps of '''Check UV Triangles''' and '''Remove Doubles''' of vertices | # After each vertex removal/merge, select and deselect (CTRL-A in edit mode) the mesh and repeat the earlier steps of '''Check UV Triangles''' and '''Remove Doubles''' of vertices | ||
[[File:Uv_error_4.webp]] | |||
Uv_error_4.webp | |||
# Not all UV errors will show up on the graph, so keep an eye on the notification at the top that tells you how many UV errors you have | # Not all UV errors will show up on the graph, so keep an eye on the notification at the top that tells you how many UV errors you have | ||
# When you've merged all the vertices causing problems, you'll see ''No UV problems found'' at the top | # When you've merged all the vertices causing problems, you'll see ''No UV problems found'' at the top | ||
[[File:Uv_error_5.webp]] | |||
Uv_error_5.webp | |||
# After you have done this for each mesh in your model, copy and paste the entire thing back into 3.X | # After you have done this for each mesh in your model, copy and paste the entire thing back into 3.X | ||
# Export as <code>.DAE</code> | # Export as <code>.DAE</code> | ||
[[Category:Modding]] | [[Category:Modding resources]] | ||
Latest revision as of 10:18, 8 November 2023
As of Full Release and the making of this plugin by Norbyte the below steps are not required when directly exporting as GR2 from blender. However if you wish to export as DAE and come across UV errors the below will work.
This tutorial is from a post shared by tyvianpear in the DbtR Discord server.
Steps[edit | edit source]
- Open two instances of Blender; 2.79b and 3.X (latest)
- Install LaughingLeaders' Blender Helpers for 2.79b into 2.79b
- Open your model in 3.X first
- Copy and paste the entire model and all its meshes into 2.79b
- Minimize (or close) 3.X, we won't need it again until the end
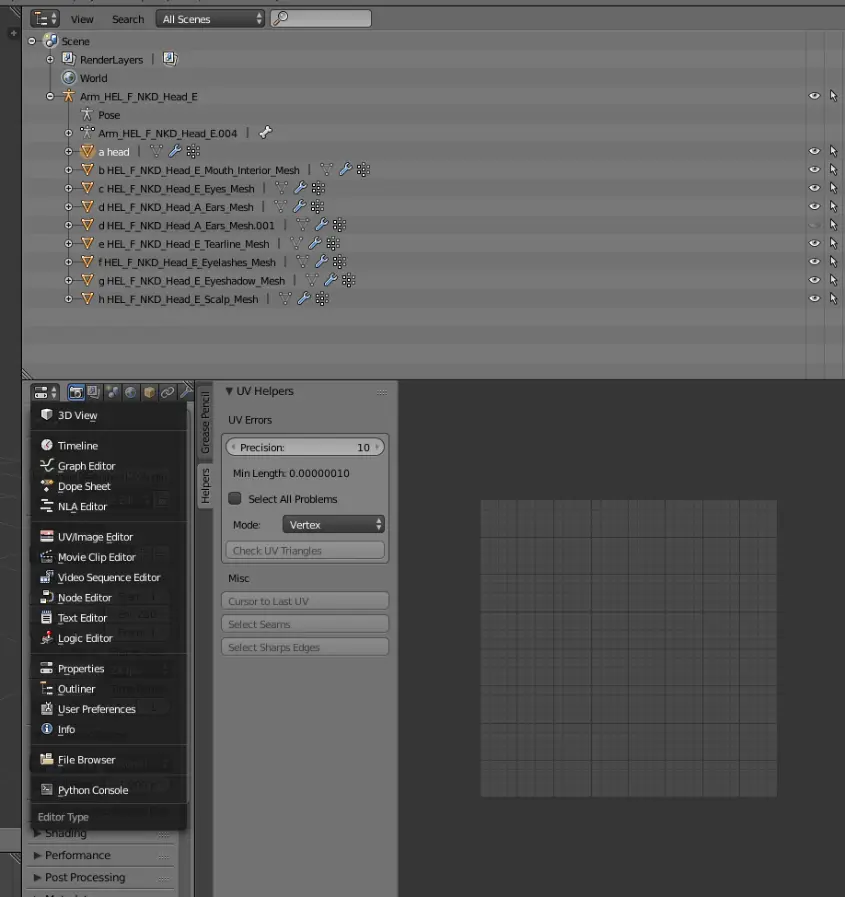
- Open up another window next to the Properties Tab by pulling on one of the stripped triangles in the top corner
- In the new window, click on the Properties button under the Project Outline, choose UV/Image Editor
- Click on the mesh you want to check first (to be on the safe side go through each mesh one by one)
- Hit TAB to go into Edit mode
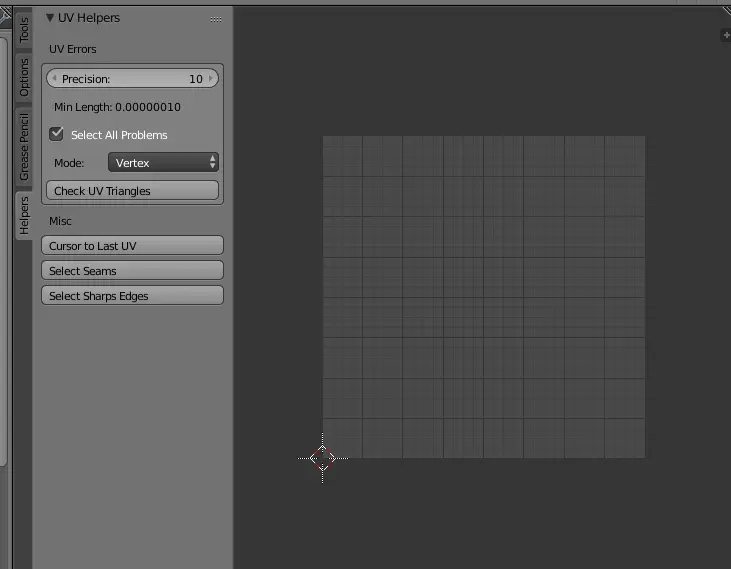
- Click on the vertical Helpers tab and make sure that the Select All Problems box is checked
- Click on Check UV Triangles
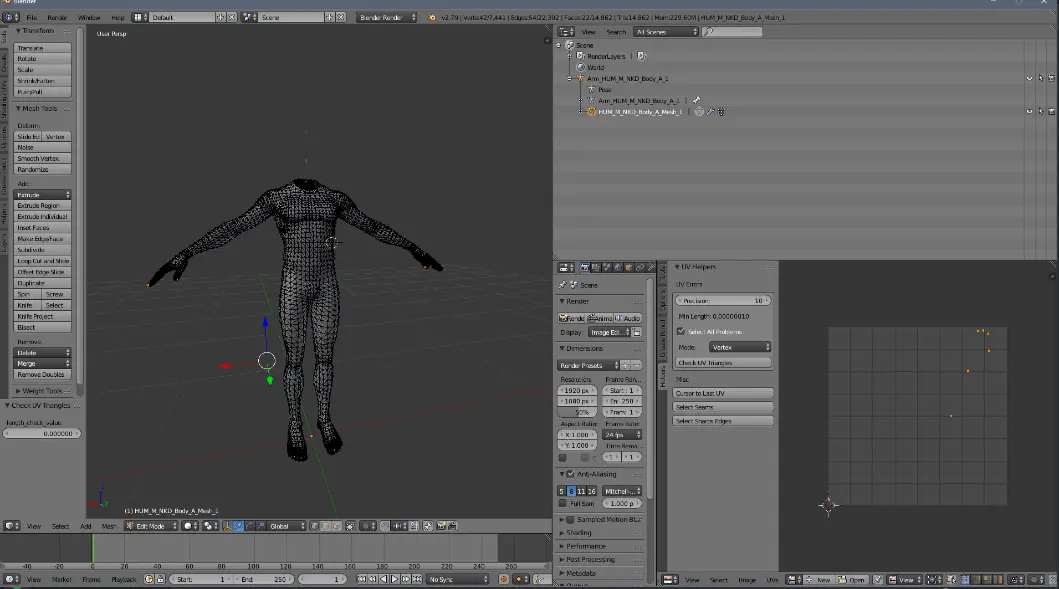
- At the very top of Blender, you'll see a notification telling you how many UV problems were found. They will also highlight them in orange on your mesh and in the graph on the right
- To the left of your model, you'll see Remove Doubles in the Tools tab
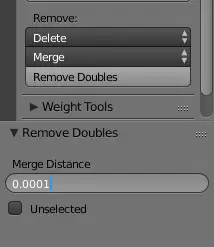
- Click on it and you'll see a message at the top, Removed 0 vertices because the merge distance is too short to combine any of the overlapping vertices
- Try changing the merge distance incrementally as small as possible. Somewhere around 0.0004 you'll see Removed X vertices at the top
- Keep an eye on your mesh and make sure it's not getting too distorted
- After each vertex removal/merge, select and deselect (CTRL-A in edit mode) the mesh and repeat the earlier steps of Check UV Triangles and Remove Doubles of vertices
- Not all UV errors will show up on the graph, so keep an eye on the notification at the top that tells you how many UV errors you have
- When you've merged all the vertices causing problems, you'll see No UV problems found at the top
- After you have done this for each mesh in your model, copy and paste the entire thing back into 3.X
- Export as
.DAE


