Modding:Face and body textures: Difference between revisions
Jump to navigation
Jump to search
No edit summary |
(→Editing the CLEA/HMVY: correcting information that was outdated/incorrect) |
||
| Line 9: | Line 9: | ||
<br>To edit CLEA/HMVY textures it is best to break them down to their RGBA channels and edit each channel individually. | <br>To edit CLEA/HMVY textures it is best to break them down to their RGBA channels and edit each channel individually. | ||
<br>For example in GIMP to separate them into their channels you would do this | <br>For example in GIMP to separate them into their channels you would do this: | ||
# Open the texture in GIMP | |||
# Go to Colors > Components > Decompose > Switch Color Model to RGBA | |||
# Once the Color Model is selected press OK. | |||
# This will open another window/page with each channel as layers. You can now edit each channel separately using the guide below to know what each channel does. | |||
# | # When you are finished making your edits go to; Colors > Components > Compose > Switch Color Model to RGBA. | ||
# Once the Color Model is selected, press OK. | |||
# It will now open another window/page with the texture repacked with its channels together. You can now export your texture. When exporting your texture make sure the extension is .DDS not .dds, and the compression is BC3/DXT5. | |||
== CLEA == | == CLEA == | ||
Revision as of 21:14, 2 November 2023
Editing the CLEA/HMVY
To edit CLEA/HMVY textures it is best to break them down to their RGBA channels and edit each channel individually.
For example in GIMP to separate them into their channels you would do this:
- Open the texture in GIMP
- Go to Colors > Components > Decompose > Switch Color Model to RGBA
- Once the Color Model is selected press OK.
- This will open another window/page with each channel as layers. You can now edit each channel separately using the guide below to know what each channel does.
- When you are finished making your edits go to; Colors > Components > Compose > Switch Color Model to RGBA.
- Once the Color Model is selected, press OK.
- It will now open another window/page with the texture repacked with its channels together. You can now export your texture. When exporting your texture make sure the extension is .DDS not .dds, and the compression is BC3/DXT5.
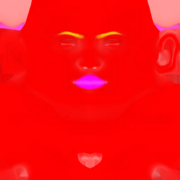
CLEA
DDS Format: BC3/DXT5 Linear
- Red Channel - Cavities
- Green Channel - Eyebrows
- Blue Channel - Lips
- Alpha Channel - Ambient Occlusion
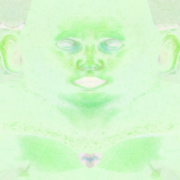
HMVY
DDS Format: BC3/DXT5 Linear
Skin tinting
- Red Channel - Hemoglobin
- Green Channel - Melanin (freckles)
- Blue Channel - Veins
- Alpha Channel - Yellowing
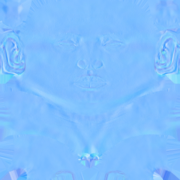
NORMAL
DDS Format: BC3/DXT5 Linear
Wrinkles, scars, any indents in the skin
To convert a "regular" normal map to BG3, put the Red channel into Alpha channel and set Red channel to black
MSK
DDS Format: BC1/DXT1 Linear
- Red Channel - Non-skin (horns, nail colour)
- Green Channel - Pigmentation (lighter = less, also vitiligo)
- Blue Channel - Tear/Lip Lines
Gallery
CLEA
HMVY
NM


